How to Replace a Two-Way Light Switch Like-for-Like
22 August 2026 Joe HartleyIntermediate45–75 minutes17 comments
Tools
- Insulated screwdriver set
- Voltage tester / proving unit (as your tester requires)
- Phone camera for COM, L1, and L2 photos
- Torch
- Matching two-way switch
- Fine permanent marker or labelled tape
Stairs and long rooms often use two-way switching: two switches, either of which can turn the light on or off. Replacing one damaged plate is still a like-for-like job if you copy COM, L1, and L2 exactly. It is not a guide to converting one-way to two-way, adding an intermediate switch, or running new strappers.
Read what electrical work can you DIY in the UK and Part P explained for homeowners if you are unsure about scope. For a single switch that is the only control for the light, use how to replace a light switch like-for-like instead.
Spot a two-way switch before you buy
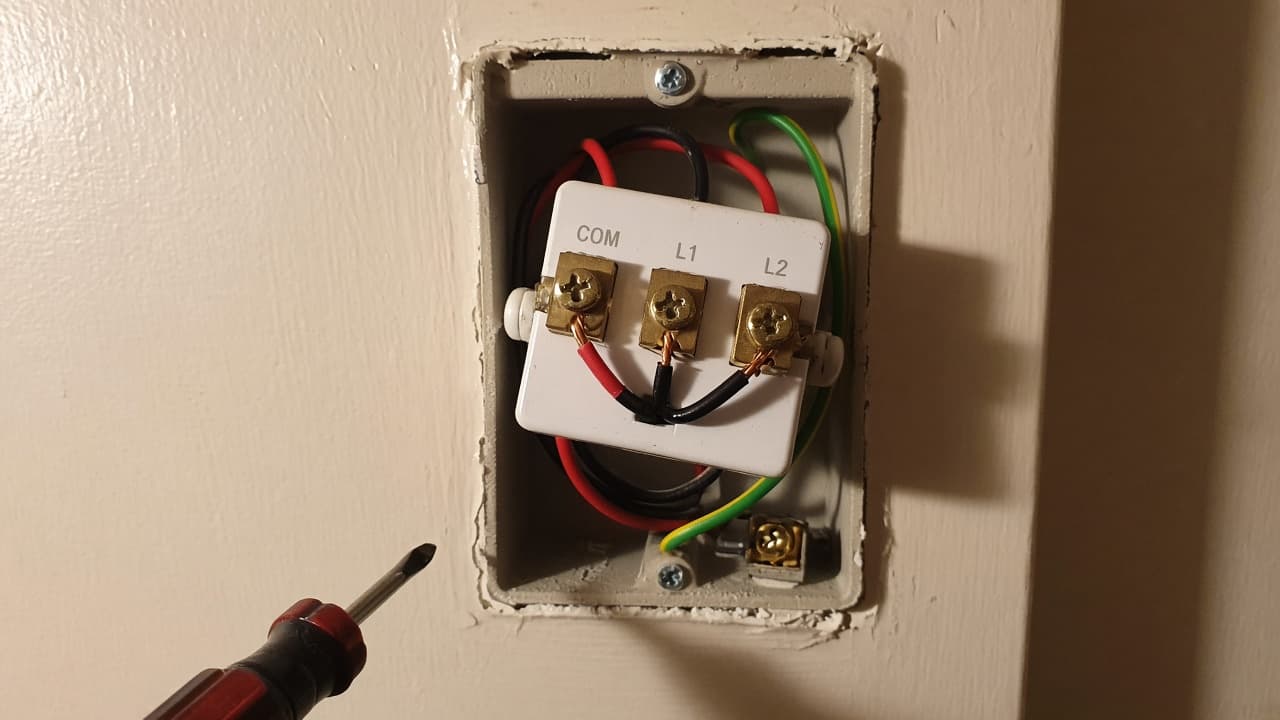
On the back of a typical UK two-way plate you will see three switching terminals: COM (common), L1, and L2. Both two-way positions in the circuit use that pattern. An intermediate switch (three or more control points) is a different accessory with a different terminal layout. If you have three wall switches for one light, do not assume this guide covers the middle one.
A practical check: if flipping either of two switches can change the light state, you are in two-way territory. Buy a two-way switch, not a one-way “because it looks the same on the front.”
Tools and parts
| Item | Notes |
|---|---|
| Two-way switch | Same gang layout as the old plate |
| Insulated screwdrivers | Match terminal screw types |
| Voltage tester | Prove dead after isolation |
| Phone | Photos of COM, L1, L2 before disconnect |
| Labels | Mark conductors if colours repeat or look identical |
| Torch | Stairwells and hall cups are often gloomy |
Take the old switch (once isolated and photographed) or a clear back photo to the store if the terminal moulding looks unusual.
Isolation for stair and hall circuits
Lighting circuits that feed landings can surprise you: the other two-way switch still sits on the same circuit. Isolate the whole lighting circuit at the consumer unit, not just the local rocker.
- Switch off the correct lighting breaker or remove the correct fuse. Do not open or rewire anything inside the consumer unit.
- Put a clear note on the consumer unit so power is not restored while you work.
- Prove dead at the switch you are replacing with your tester, following its instructions.
- If you cannot identify the circuit or cannot prove dead, stop. This is electrician territory.
Never step through adding cable between switches or altering the consumer unit. Those jobs are outside DIY scope on this site.
Step-by-step (COM / L1 / L2)
1. Ease the plate off
Undo the faceplate screws and draw the switch forward carefully. Strap cables in two-way boxes can be short; do not pull as if you are freeing a stuck shelf bracket.
2. Record COM, L1, and L2
Photograph the back so each terminal marking and its conductor(s) are readable. Then, if helpful, put a small labelled wrap on each conductor: COM, L1, L2. Colours alone are not enough. In older wiring you may see red and black, with black used as a switch wire and sleeved; modern brown and blue can also appear with brown sleeving on a switch wire. Your labels and photos beat memory.
3. Stop rules before you disconnect
Refit the old switch and call an electrician if:
- Terminal markings do not show a clear COM / L1 / L2 set
- Conductor count per terminal does not match what the new switch can accept
- You find burning, melted plastic, or crumbly insulation
- You realise the plate is an intermediate switch, not two-way
Like-for-like means the new plate uses the same three terminals the same way. It does not mean improvising a bridge because one screw is missing.
4. Move conductors by label, not by guess
Transfer the COM conductor(s) to COM on the new switch, L1 to L1, L2 to L2. Tighten firmly without shearing strands. Keep earths continuous and properly terminated where the accessory or box requires them, especially on metal plates.
5. Test both switch positions
Seat the plate without trapping conductors. Restore the breaker. Check the light from both two-way switches through a full on/off cycle. If either position does nothing, or the breaker trips, isolate again and do not keep resetting. Wrong COM/L1/L2 mapping is a common cause of “dead” two-way behaviour after a DIY swap; if your photos were unclear, get an electrician rather than trial-and-error on live terminals.
Where two-way swaps usually go wrong
- Isolating only at the rocker and assuming the other landing switch is dead. Both share the lighting circuit; kill it at the consumer unit.
- Fitting a one-way switch on a two-way circuit because the fronts matched.
- Swapping L1 and L2 while moving COM correctly, then assuming the product is faulty when one switch acts oddly.
- Labelling nothing, then dropping three similar browns into a deep box and guessing.
- Declaring the job done after testing only the switch you replaced. Work both positions through a full on/off cycle.
- Treating an intermediate (three-position) plate as a two-way and forcing conductors onto COM/L1/L2.
- Working on one switch while someone else is still using the landing light circuit upstairs.
When to call an electrician
Call a registered electrician for intermediate switching, damaged strap cables, scorched terminals, RCD or breaker trips after reconnection, metal boxes with missing earths, or any plan that adds a third switch position. Call one if you cannot isolate the lighting circuit cleanly.
See also: one-way like-for-like switch, socket faceplate like-for-like, DIY vs electrician table, Part P explained for homeowners.
FAQ
What do COM, L1, and L2 mean on a two-way switch?
COM is the common terminal. L1 and L2 are the other two way terminals. In a two-way pair, the commons and strappers are arranged so either switch can change the light state. Copy the old mapping exactly; do not invent a new one from a generic diagram that ignores your photos.
Can I replace only one of the two switches?
Yes, like-for-like on that plate alone. The other switch stays as it is. Still isolate the whole lighting circuit, because both accessories share it.
Why does the light only work from one switch after I finished?
Often COM / L1 / L2 were not copied correctly, or a conductor is loose. Isolate, compare to your photos, and correct only if the map is obvious. If it is not, hire an electrician rather than live experimentation.
Is converting one-way to two-way covered here?
No. That needs extra cable between switch positions and is outside this like-for-like guide. See what electrical work can you DIY in the UK and book a registered electrician for circuit changes.
17 comments